

Mechanical keyboards are beloved by many for their tactile feedback and durability. However, as with any other type of keyboard, they can accumulate dirt, dust, and grime over time. Regular cleaning is essential to ensure proper functioning and prevent potential issues. In this article, we will explore the process of removing mechanical keyboard keys and provide helpful tips for cleaning and maintenance.
Quick Facts
| Topic | Details |
|---|---|
| What is a Mechanical Keyboard | Mechanical keyboards are keyboards that use individual mechanical switches for each key, providing a tactile and satisfying typing experience. They are durable and highly customizable, with the option to swap out keycaps and change the type of switches used. |
| Importance of Cleaning | Regular cleaning is necessary to remove dirt, dust, and debris that can accumulate between and under the keys. If left unattended, these particles can interfere with the key switches’ performance, leading to sticky or unresponsive keys. Regular cleaning also promotes a hygienic workspace. |
| Potential Issues from Neglecting Cleaning | If left uncleaned, the buildup of grime can hinder the key switches’ movement, affecting the keyboard’s overall functionality. In the long run, keys may start to stick or become unresponsive. Liquid spills can seep into the keyboard’s internal components, causing irreversible damage. |
| Tools Needed for Key Removal | The key tool for key removal is a keycap puller. This tool allows for the safe and even removal of keycaps from their switches. Additionally, cleaning materials such as a soft cleaning brush or compressed air, mild cleaning solution, and a microfiber cloth are necessary for cleaning the keyboard and keycaps. |
| Removing Keys Without a Keycap Puller | If you do not have a keycap puller, you can still remove the keys using a flat, thin object. The object is inserted under the corner of the keycap and gentle upward pressure is applied until the keycap pops off the switch. |
| Cleaning and Maintenance Tips | Clean the keycaps by soaking them in warm water with mild dish soap and gently scrubbing with a soft brush. Use a soft brush or compressed air to remove loose debris from the keyboard base. Regular maintenance, including keeping your workspace clean and immediate action in case of spills, extends the lifespan of your keyboard. |
Understanding Mechanical Keyboards
When it comes to typing, the keyboard is an essential tool that we interact with on a daily basis. While most people are familiar with the standard membrane keyboards that are commonly found on laptops and desktop computers, there is another type of keyboard that offers a completely different experience – the mechanical keyboard.
What is a Mechanical Keyboard?
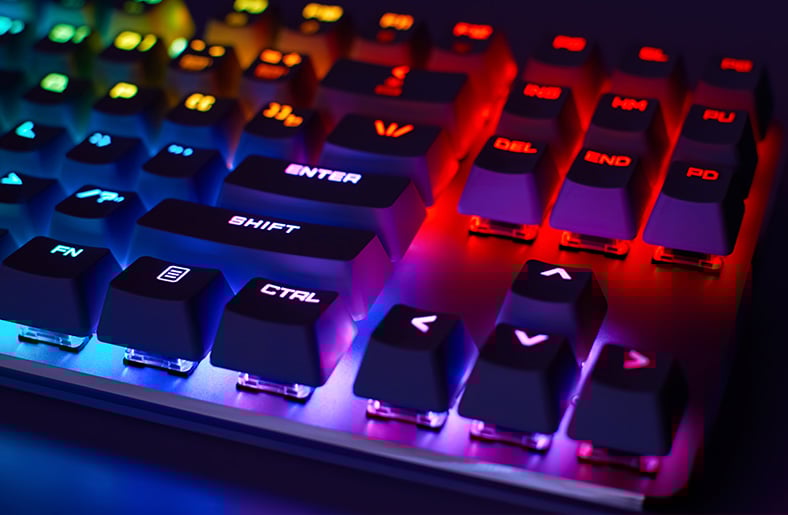
A mechanical keyboard is a type of keyboard that uses individual mechanical switches for each key. These switches are designed to provide a more satisfying and tactile typing experience compared to the rubber dome switches found in most membrane keyboards. With each key having its own switch, mechanical keyboards offer a more precise and responsive typing experience.
One of the main advantages of mechanical keyboards is their durability. The individual switches are designed to withstand millions of keystrokes, making them ideal for heavy typists or gamers who require fast and precise input. Additionally, mechanical keyboards often have a longer lifespan compared to membrane keyboards, as the switches can be easily replaced if they become worn out or damaged.

Another notable feature of mechanical keyboards is the customization options they offer. Unlike membrane keyboards, which usually have a fixed layout, mechanical keyboards allow users to swap out keycaps and even change the type of switches used. This level of customization allows users to tailor the keyboard to their specific preferences, whether it’s for gaming, typing, or simply personal preference.
The Structure of a Mechanical Keyboard
Understanding the structure of a mechanical keyboard is crucial when it comes to removing and cleaning the individual keys. While the overall design may vary depending on the brand and model, most mechanical keyboards consist of several key components.
The keycaps are the visible part of the keyboard that we interact with. They are typically made of plastic and come in various shapes, sizes, and designs. Keycaps can be easily removed and replaced, allowing users to customize the look of their keyboard or replace worn-out keycaps.

Beneath the keycaps are the key switches, which are the heart of a mechanical keyboard. These switches determine the feel and sound of each keystroke. There are several types of key switches available, each with its own characteristics. Some switches provide a tactile bump or click sound, while others offer a smoother and quieter typing experience. The choice of key switches is often a matter of personal preference.

The PCB (Printed Circuit Board) is the electronic component that connects the key switches to the computer. It acts as the central hub, transmitting the electrical signals from each key press to the computer. The PCB also allows for advanced features such as anti-ghosting and programmability.
Finally, the keyboard base provides a solid foundation for the keyboard and houses all the components. It is usually made of plastic or metal and is designed to provide stability and support. The base may also include additional features such as adjustable feet for ergonomic typing positions or cable management options.
Overall, the structure of a mechanical keyboard is carefully designed to ensure a reliable and enjoyable typing experience. Whether you’re a gamer, a programmer, or someone who spends hours typing every day, a mechanical keyboard can greatly enhance your productivity and overall typing experience.
The Importance of Cleaning Your Mechanical Keyboard
Having a clean mechanical keyboard is essential for maintaining its performance and longevity. Regular cleaning is necessary to remove dirt, dust, and debris that can accumulate between and under the keys. Over time, these particles can interfere with the key switches’ performance, leading to sticky or unresponsive keys.
When you use your keyboard every day, it is inevitable that it will collect dust and other particles. Even if you try to keep your workspace clean, microscopic debris can still find its way into the tiny crevices of your keyboard. This build-up can affect the overall typing experience and even cause discomfort or frustration while using the keyboard.
Potential Issues from Neglecting Cleaning
Neglecting to clean your mechanical keyboard can have several consequences. The accumulation of grime can hinder the key switches’ movement, resulting in inconsistent or unreliable typing. You may notice that some keys feel different from others, requiring more force to register a keystroke or feeling mushy when pressed.
As time goes on, the build-up of dirt and debris can become more significant, affecting the keyboard’s overall functionality. The keys may start to stick or become unresponsive, making it difficult to type efficiently. This can be particularly frustrating when you’re in the middle of an important task or trying to meet a deadline.
Another potential issue that can arise from neglecting keyboard cleaning is the risk of liquid spills. Accidents happen, and if you accidentally spill a drink or any other liquid on your keyboard, it is crucial to clean it immediately. If left unattended, liquid spills can seep into the keyboard’s internal components, causing irreversible damage. The liquid can corrode the circuits, leading to malfunctioning keys or even rendering the entire keyboard unusable.
Regular cleaning not only helps prevent these issues but also promotes a hygienic workspace. Keyboards can harbor bacteria and germs, especially if you eat or drink near your computer. By keeping your keyboard clean, you reduce the risk of spreading illness-causing pathogens and maintain a healthier environment.
It is recommended to establish a cleaning routine for your mechanical keyboard. Depending on your usage and environment, you may need to clean it every few weeks or once a month. There are various methods and tools available for cleaning, such as using compressed air, a soft brush, or even removing the keycaps for a more thorough cleaning.
Tools Needed for Key Removal
Keycap Puller
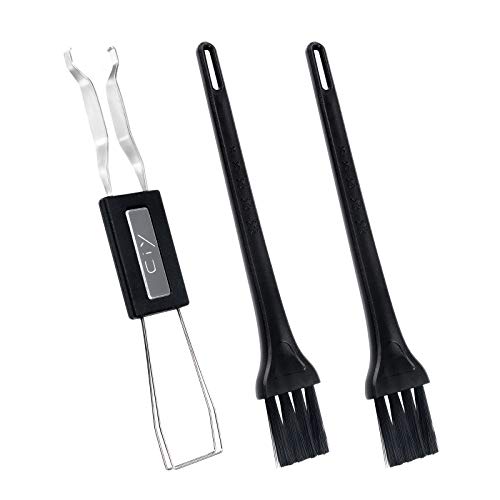
A keycap puller is a handy tool designed to safely remove keycaps from a mechanical keyboard. It allows you to grip the keycap evenly and prevent the risk of damaging the key switch or the keycap itself.
When it comes to maintaining your mechanical keyboard, having a keycap puller is essential. This small but mighty tool is specifically designed to make the process of removing keycaps a breeze. With its ergonomic design and sturdy construction, a keycap puller ensures that you can remove keycaps without applying excessive force or causing any damage.
Using a keycap puller is simple. Start by inserting the ends of the puller under the sides of the keycap you want to remove. Gently wiggle the puller back and forth, applying even pressure, until the keycap pops off. It’s important to note that different keycap pullers may have slightly different designs, so always refer to the manufacturer’s instructions for the specific puller you are using.
Whether you are a keyboard enthusiast who loves customizing your keyboard or simply someone who wants to clean their keyboard thoroughly, a keycap puller is an indispensable tool that should be in your arsenal.
Cleaning Materials

Before you begin removing the keys, ensure that you have the right cleaning materials. You will need a soft cleaning brush or compressed air to remove loose debris, a mild cleaning solution, and a microfiber cloth to clean the keycaps and keyboard base.
Cleaning your keyboard regularly is crucial to maintain its performance and longevity. Over time, dust, crumbs, and other debris can accumulate between the keycaps and affect the keyboard’s functionality. Having the appropriate cleaning materials will make the process easier and more effective.
A soft cleaning brush or compressed air can be used to remove loose debris from between the keycaps. Gently brush or blow the debris away, being careful not to dislodge any keycaps in the process.
For a deeper clean, a mild cleaning solution is recommended. You can create your own cleaning solution by mixing a small amount of gentle dish soap with warm water. Dip a microfiber cloth into the solution and wring out any excess liquid. Wipe down the keycaps and keyboard base, paying extra attention to any areas with visible dirt or stains.
Remember to always let your keyboard dry completely before reattaching the keycaps and using it again. This will prevent any potential damage to the electronic components.
By having the right cleaning materials on hand, you can ensure that your keyboard remains clean, hygienic, and in optimal condition for a satisfying typing experience.
Step-by-Step Guide to Removing Mechanical Keyboard Keys
Are you tired of the dirt and grime that has accumulated on your mechanical keyboard keys? Don’t worry, we’ve got you covered! In this step-by-step guide, we will walk you through the process of removing your keyboard keys for a thorough cleaning or replacement. So, let’s get started!
Preparing Your Workspace
Before diving into the key removal process, it’s important to set up a clean and well-lit workspace. Clear any clutter from your desk and make sure you have enough room to maneuver. This will ensure that you have a comfortable and efficient working environment.
Additionally, it’s a good idea to prepare a container or tray where you can safely place the removed keycaps. This will prevent them from rolling off the table or getting lost in the chaos of your workspace. Trust us, you don’t want to spend hours searching for that one elusive keycap!
Using a Keycap Puller
If your mechanical keyboard came with a keycap puller, consider yourself lucky! This handy tool makes the key removal process a breeze. To begin, locate the keycap you wish to remove.
Take the keycap puller and position it around the keycap. Make sure it firmly grips the sides of the keycap. With a gentle wiggle, apply upward pressure to detach the keycap from the switch. Voila! The keycap should pop right off, exposing the switch underneath.
Repeat this process for all the keys you want to clean or replace. Take your time and be careful not to rush, as rushing may lead to accidental damage to the keycaps or switches.

Removing Keys Without a Keycap Puller
Don’t worry if you don’t have a keycap puller at hand. You can still remove the keys using an alternative method. Here’s how:
First, locate the keycap you want to remove. Take a moment to appreciate its design and the satisfying click it makes when pressed.
Now, find a flat, thin object that can fit under the corner of the keycap. This could be a small screwdriver, a plastic card, or even a guitar pick if you’re feeling adventurous.
Gently insert your chosen tool under the corner of the keycap, ensuring that it is securely positioned. Apply a gentle upward pressure, and you should feel the keycap start to pop off the switch. Take a deep breath and savor the small victory of successfully removing a keycap!
Remember, it’s crucial to exercise caution and avoid using excessive force. Applying too much pressure can potentially damage the delicate switch or keycap, leading to an unwanted headache.
And there you have it! A comprehensive guide to removing your mechanical keyboard keys. Whether you’re on a cleaning spree or planning to replace a few worn-out keycaps, this step-by-step process will help you achieve your goal. So, roll up your sleeves, gather your tools, and let’s give your keyboard a well-deserved makeover!
Cleaning and Maintenance Tips
Cleaning the Keycaps
Place the keycaps in a bowl filled with warm water and mild dish soap. Allow them to soak for a few minutes. Gently scrub the keycaps with a soft brush to remove any remaining dirt or grime. Rinse them thoroughly and let them air dry before reattaching them to the keyboard.
Cleaning the Keyboard Base
Use a soft brush or compressed air to remove loose debris from the keyboard base. If there are stubborn stains or residue, dampen a microfiber cloth with a mild cleaning solution and gently wipe the affected areas. Ensure the keyboard is completely dry before reconnecting it to your computer.
Regular Maintenance for Longer Lifespan
To extend the lifespan of your mechanical keyboard, incorporate regular maintenance practices. Keep your workspace clean to prevent debris from accumulating. If any spills occur, immediately disconnect the keyboard and clean it thoroughly to avoid damage. Additionally, consider investing in a keyboard cover or dust cover to protect your keyboard when not in use.
Conclusion
By following these step-by-step instructions and incorporating regular cleaning and maintenance, you can ensure that your mechanical keyboard remains in optimal condition, providing you with a satisfying typing experience for years to come.
FAQs
How do you remove the keycap on a mechanical keyboard?
You remove the keycap on a mechanical keyboard using a keycap puller. Insert the ends of the puller under the sides of the keycap you want to remove. Then, gently wiggle the puller back and forth, applying even pressure, until the keycap pops off.
How do you remove a key from a mechanical keyboard without a tool?
Even without a keycap puller, you can remove a key from a mechanical keyboard. Find a flat, thin object that can fit under the corner of the keycap, such as a small screwdriver or a plastic card. Gently insert the object under the corner of the keycap and apply a gentle upward pressure until the keycap pops off the switch. Be careful not to apply too much pressure as it can potentially damage the delicate switch or keycap.
How do you remove a mechanical keyboard key switch?
Removing a mechanical keyboard key switch is more complex than removing a keycap and often requires a switch puller. After removing the keycap, you use the switch puller to grip the sides of the switch and pull upwards gently to remove it. However, this process can differ based on the keyboard’s design. Some keyboards may require you to disassemble the keyboard base to access the switches. Please note, removing switches should be done with caution as improper handling may cause damage.
Can I remove keyboard keys to clean?
Yes, you can remove the keys from a mechanical keyboard for cleaning. Regular cleaning can prevent the build-up of dirt and dust that can affect key switch performance over time. Remember, when cleaning, the keycaps should be handled gently, and the keyboard itself should be thoroughly dry before reattaching the keycaps and using it again.
