

Pls Donate is a Roblox donation game where you can put up stands to sell clothing or game passes to other players. It’s a smart way to earn some extra Robux. Alternatively, you can donate Robux to stands from your fellow Roblox players and get all sorts of insane goods!
That sounds great, but getting started with Pls Donate on can be a tad more challenging than it may seem, so it’s okay if you can’t figure it out! You’ll need to go through some additional steps you wouldn’t need when playing on PC.
Don’t worry, though; we’re here to show you exactly how to make your dream stand in Pls Donate in three easily digestible steps: add items for sale, claim a stand, and customize your stand. We’ve also included some tips to help you boost your earnings. By the end of this article, you’ll be able to turn your creativity into a huge profit.
Step #1: Add Items for Sale
Before we get our stand up and ready to go, we need to get some items for sale. You can sell t-shirts and gamepasses but most opt for gamepasses since they’re free. For items to appear for sale in the game, you need to add them as sellable items from Roblox Studio’s Create page. You can also create gamepasses for free from the Create page.
-

Continue in browser and display the desktop site
Open up your browser and head to Roblox. Click on the grayed continue in browser button and then set your browser tab to display the desktop site. For Google Chrome the option is found by clicking the 3 dots and then checking the “Desktop site” checkbox. Each browser has a similar option available so look for yours and make sure it’s on, otherwise you won’t be able to access your creations!
-
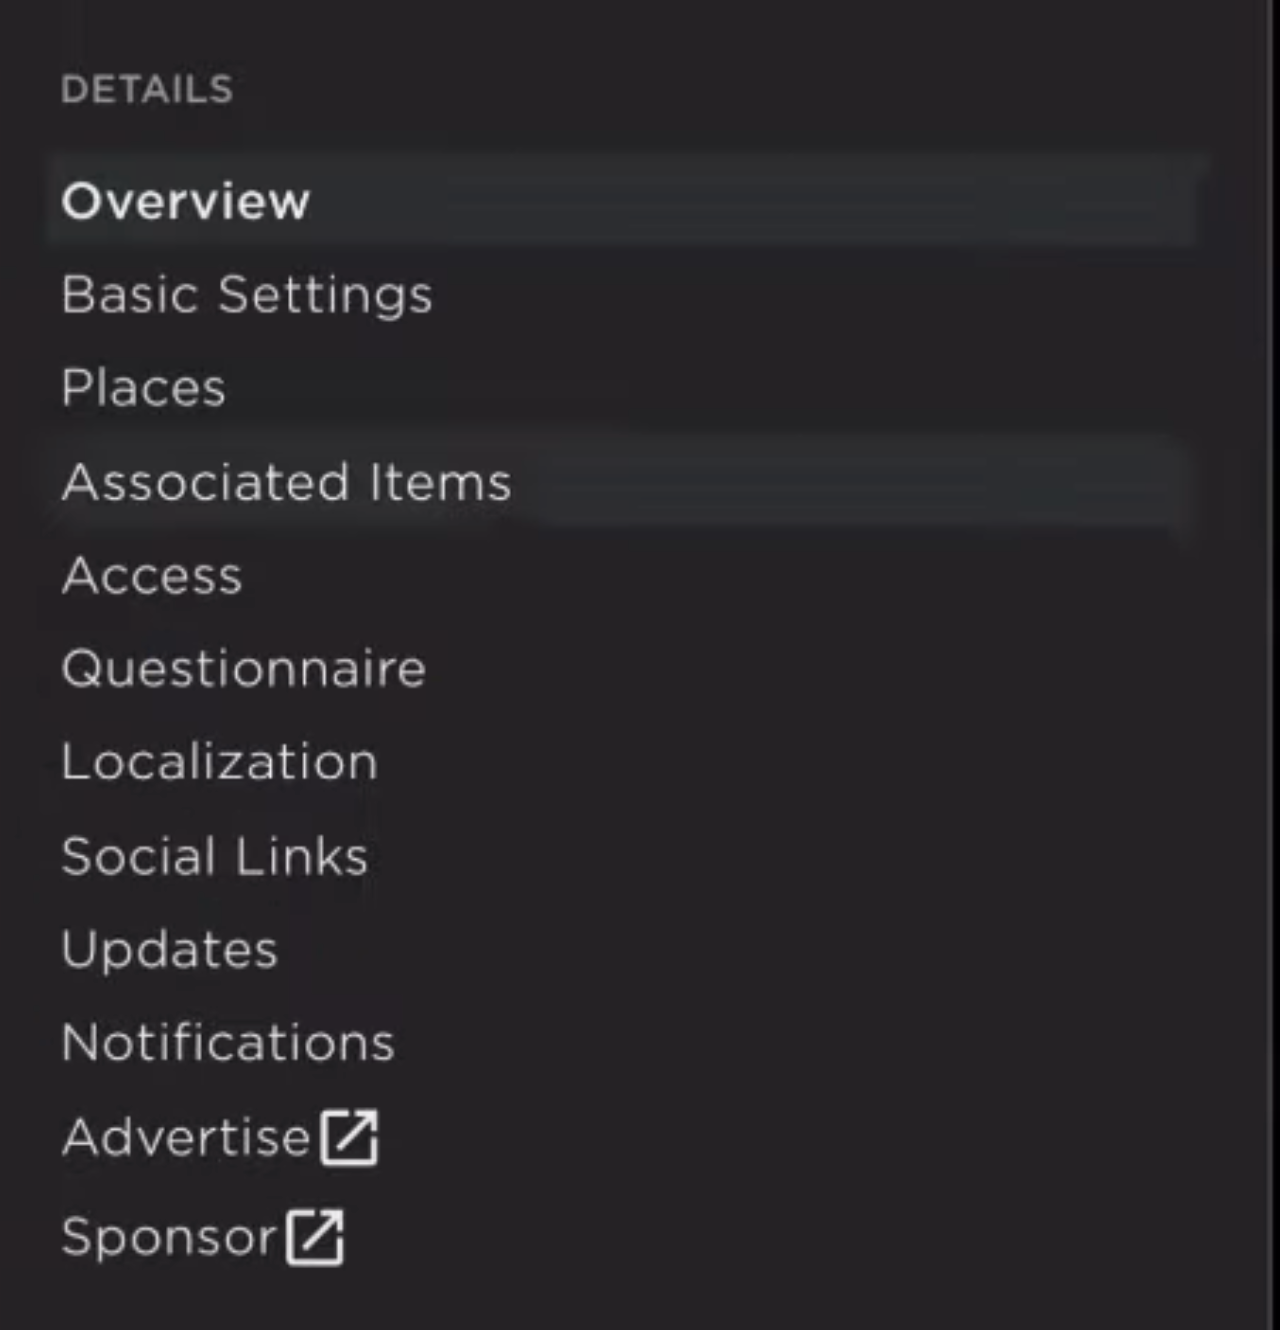
Creator Menu – Details – Associated Items
Once you log into your account, tap Create in the navigation bar under the search button to head to your creations. By default, you should have one experience inside the page you’re shown. Tap the experience to open it up and then click on the 3 bars in the top left to open up the creator menu. Here you need to go to Associated Items to create an item.
-
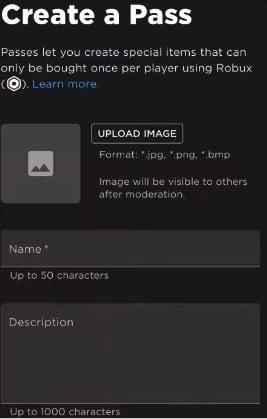
Create a Pass
Tap on Passes in the Associated Items page and the blue “Create a Pass” button on the next one to make your own gamepass. You’ll be taken to a form where you can let your creativity shine to make sellable passes for Pls Donate! Upload the image you want to display for your pass, or take one using your camera and give it a name and a description. You can use the description field to flaunt your items or say thanks to the people donating as well.
Once you’re done filling the form, click Create Pass to submit it. Now go back to Passes inside the Associated Items page and you should be able to see the pass you just created, great job! But wait, it’s too early to celebrate since the item is currently listed as offsale till we tinker around a bit more. Click on the pass to get to its basic settings page.
-

Creator Menu – Details – Sales
Once here tap the 3 bars once again to access the creator menu for the pass and find “Sales” under Details.
-
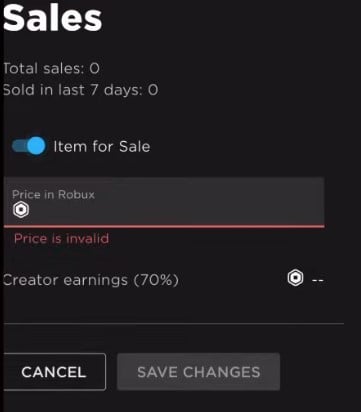
Sales Page
In the Sales page, turn the slider button to enable the Item for Sale and, here’s the most fun part, quote your price! When deciding a price, keep in mind that 30% of the sale revenue is kept by Roblox and 70% of it is sent to us. Also keep in mind to not go overboard with the price but don’t sell yourself short either!
Once you’re comfortable with your price, hit save changes and we’re finally done with the browser part of things! Feel free to repeat these steps to create up to four items that you can put on sale on a stand in Pls Donate.
Step #2: Claim a Stand
-

Credits: OStuff (https://www.youtube.com/watch?v=vZY7hRWUKr0)
The second step to getting yourself your very own stand in Pls Donate is claiming an empty stand. In this game, a stand is a small booth where you can display your message and your items for sale, and you’ll see many when you hop in the game. Once you launch the game, you need to find one that is not already claimed by another player, but it’s not that simple if you really wanna make the big bucks!
When picking between stands, you need to think strategically about the location of your stand. Try to pick a stand that is easy to access for other players and hard to miss out on. Your best options for positioning would be as near the spawn point as possible or on the main road, so if you find an empty stand around these places, claim it!
Once you’ve found a stand in a location you like, you need to walk up to it till you see a blue “Claim” button. Hold the white space in the blue button till the square border fills and you’ll see the items you listed on sale get their own donation buttons according to your quoted prices!
You will also see the Claim button change to an “Edit” button. This option provides a menu where you can name your stand and choose a model for it. You can also see how much Robux you have earned from your stand so far. Let’s use the menu to customize our stand before we finish!
Step #3: Customize your Stand
Creative customizing is the last step for any good stand in Pls Donate. We will use different options in the Edit menu to customize our stand’s appearance and text to make it more enticing and unique.
It’s a good idea to first consider the design and the message of your stand in your head and then try to implement it instead of throwing customizations around randomly. Think of a design that is eye-catching and matches your theme and style.
You also want to make sure your message is clear and engaging, tells other players what you are offering, why they should donate to you, and do all this concisely.
-
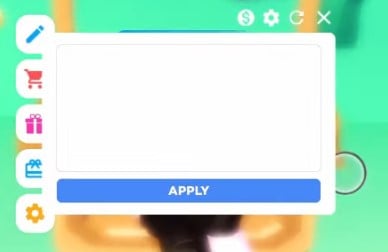
Edit menu
Heading into the edit menu the first textbox that shows up is what we use to write our message. Type the message you’ve thought of for the display into this box and hit apply. You should now see your message displayed on the banner of your stand.
To personalize our stand let’s tap the gear icon on top of the textbox. This should show you a horizontally scrollable list of any booth models you own, and you can buy more of these from the shop using in-game currency. Choose the look that best matches the vibe of whatever it is you’re selling!
Clicking the dollar icon on top of the textbox will show you your top donations and keep you motivated to earn more, so use it to monitor your growth well.
Conclusion
Congratulations! You now have your very own stand in Pls Donate. If you have followed all the tips we dropped in, you’re going to make a killing off of the stand you’ve just made for sure! So what’s the wait for, hurry up and earn those Robux.
Don’t forget to let us know what witty ideas you had for your stand and see what others in the community are up to down in the comments section down below!

1 Comment
What If We Don’t Have 10 Or More Robux?